CHEMISTRY HOME
BLACKBOARD LOGIN
LAB MANUAL HOME
SYLLABUS
|
What you need to do:
Building a Potential Series
Each lab bench will work as a group to build the voltaic cells.
- Obtain 4 styrofoam cups from the front counter. Cut the tops off the cups so that the cup that remains is ~5 cm deep.
- Obtain a sheet of white cardstock from the front counter and tape the cups to the paper according to the design below:
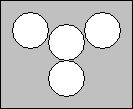
- Fill the cup in the middle about half full with 0.5 M NH4NO3. Label the paper above the cup with the name and concentration of what is in the cup.
- Fill one of the other three cups half full with 0.5M CuSO4. Label the paper to the side of the cup with the name and concentration of what is in the cup.
- Fill one of the remaining two cups half full with 0.5M MgSO4. Label the paper to the side of the cup with the name and concentration of what is in the cup.
- Fill the remaining cup half full with 0.5M FeSO4. Label the paper to the side of the cup with the name and concentration of what is in the cup.
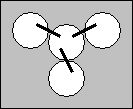
- Obtain 3 filter papers from the front counter and fold them into 1 cm strips.
- Bend one of the strips into a “U” shape. Place one end of the “U” into the center cup making sure that it contacts the solution and then place the other end into any of the other three cups. The filter paper will act as a salt bridge between the three solutions you are measuring.
- Repeat step 8 until there is a salt bridge between the center cup and all three of the other cups.
- Obtain a multimeter and set it to read VDC .
- Obtain a piece of copper, iron and magnesium metal from the front counter. Use sand paper to “shine “ the surfaces of the metal pieces.
- Attach the positve end of the multimeter to the piece of magnesium and place it in the MgSO4 solution so that the metal piece is partially submerged. (DO NOT SUBMERGE THE ALLIGATOR CLIPS IN THE SOLUTION) Use tape to adhere the probe and metal in place if necessary. It is easiest if you simply hold both probes in place.
- Attach the negative end of the multimeter to the piece of copper and place it in the CuSO4 solution so that the metal piece is partially submerged. (DO NOT SUBMERGE THE ALLIGATOR CLIPS IN THE SOLUTION) Use tape to adhere the probe and metal in place if necessary.

- Measure the potential and record it in your lab notebook. If the potential is negative, switch the probes between the metals.
- Repeat steps 13 - 15 using copper and iron. Be sure to place the piece of iron metal in the FeSO4 solution.
- Repeat steps 13 – 15 for magnesium and iron.
|
|
